

In today’s interconnected world, smart home devices have become ubiquitous, but they also introduce unique security challenges. In this blog we explore the vulnerabilities identified during our security research on Sonoff Smart Home IoT devices, which earned CVE-2024-7205 and CVE-2024-7206.
The blog covers the basics of the target device, and discusses the methodology used for assessing its security posture, overcoming integrity checks to successfully boot modified firmware and finally performing a Man-in-the-Middle attack.
Previous research from Bitdefender uncovered cloud-based vulnerabilities on the same target. While our main objective was to uncover vulnerabilities in Sonoff Smart Home IoT devices, we specifically targeted the hardware and firmware.
Target Description
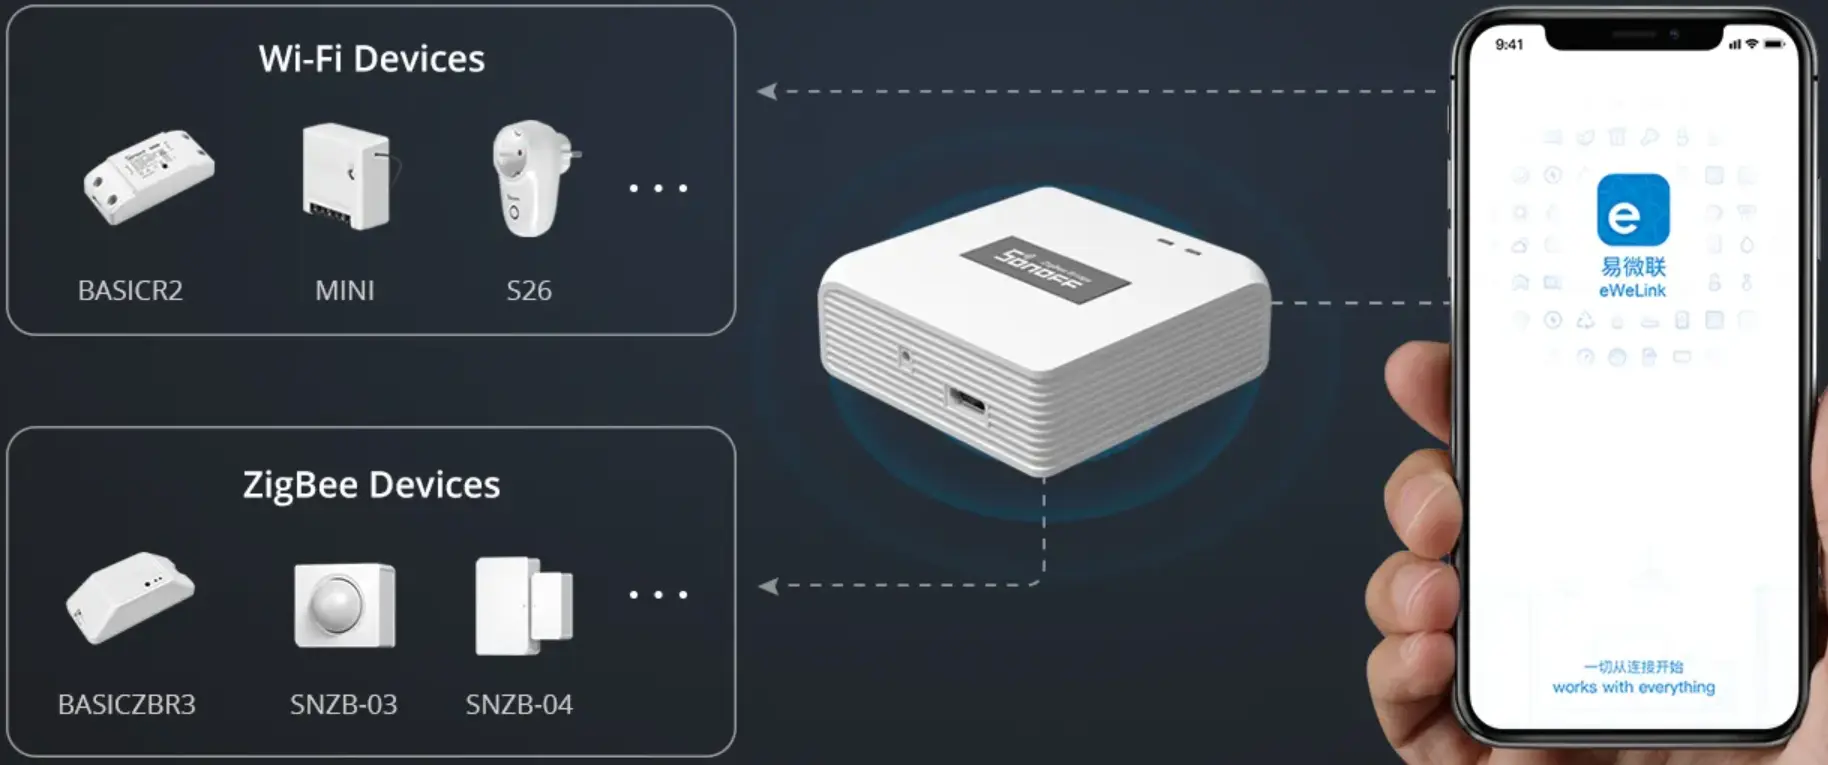
Sonoff has a wide range of smart home products, including smart switches, lights, gateways, sensors, etc.. The aim of our security research was to uncover vulnerabilities in Sonoff Wifi Devices. The target device selected for this security research was the Sonoff ZigBee Bridge (ZB Bridge) - one of the Sonoff Wifi devices. The Sonoff ZigBee Bridge connects to various sensors over ZigBee, accumulates the data and sends it to the cloud. The eWelink app is used to interact with the devices and access data over the cloud.
The eWelink App is used to pair the device over Bluetooth. The app provides other features, such as device sharing with a secondary user, where the secondary user can also interact with the device. The paid version allows the primary user to restrict access to the secondary user.
Target Product Versions:
    Ewelink App version - 5.3.0
    Firmware Version    - 1.3.0
Target Reconnaissance
As part of the initial recon, to gain more information about the hardware, we began with a physical teardown. Opening the device gave us our first look at its internal hardware, and allowed us to analyse the PCB and its components.
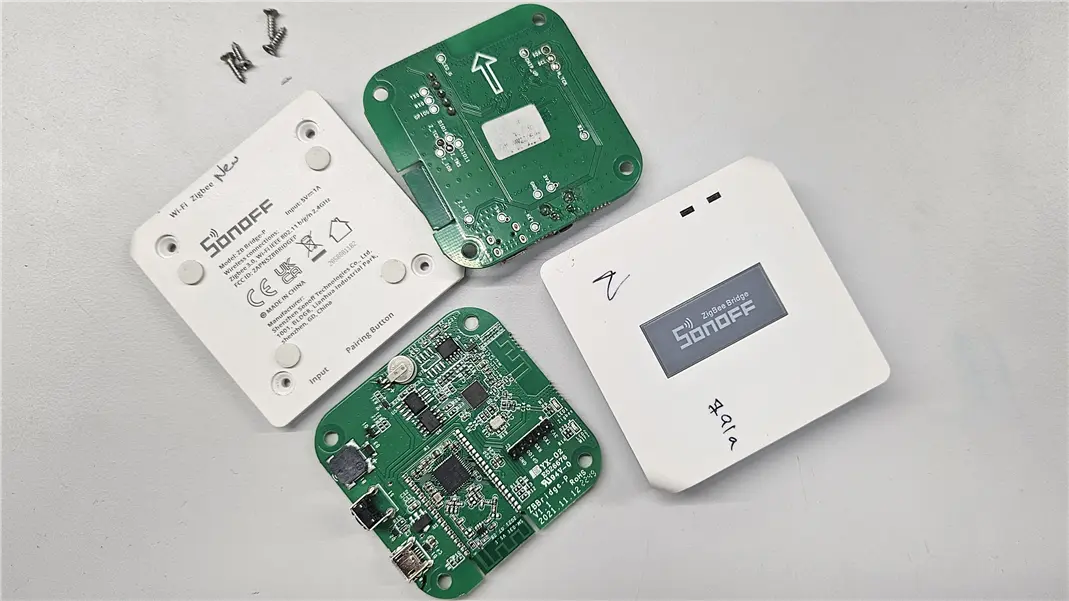

The main components of interest to us are the following :
* CC2652 MCU
* ESP32 D0WD-V3
* SPI Flash(ZB25VQ32)
* Debug Port
The CC-based MCU is used for ZigBee communication, while the EPS32 based MCU serves as the brain of the device, managing all other smart home functionalities and the Wifi connectivity.
Firmware Extraction
Analyzing the firmware of an IoT device is a crucial step in security research, as it can reveal potential vulnerabilities, hardcoded secrets, and APIs that could be exploited. There are several methods to extract firmware such as Memory Chip Extraction, Firmware Update File, Debug Port etc.
Debug port analysis
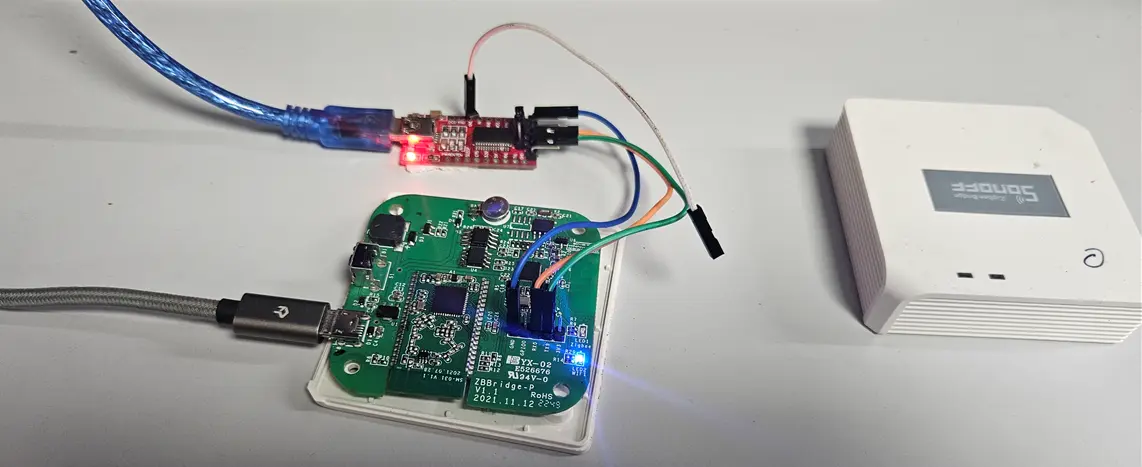
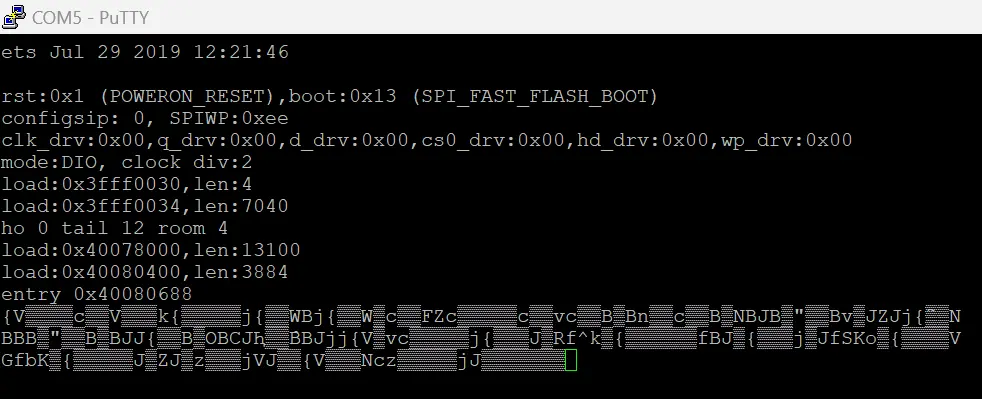
We decided to investigate the debug port on the target device to determine if the firmware could be extracted through it. Analyzing the PCB markings, it appeared to be a UART debug port. On connecting it with a USB to serial converter we get boot logs as shown in the figure below
Boot Mode
On referring to the ESP32 Datasheet, we understand that the the chip allows configuring its boot parameters through Strapping pins, GPIO0 is one of the strapping pins which controls the boot mode. This pin is also present on the debug port. Using this pin, we switched the boot mode and got access to the download boot mode.

Once the device is in download boot mode, we can utilize Esptool, a Python-based utility, to communicate with the device. Esptool allows us to interact with the ROM bootloader in Espressif SoCs, providing various capabilities such as:
* Reading, writing, erasing, and verifying binary data stored in the flash memory.
* Retrieving chip features and other related data, including the MAC address or flash chip ID.
* Preparing binary executable images ready for flashing.
Firmware Analysis
ESP32 Partition Table
To extract the full flash contents, we can use Esptool. However, let’s dive deep down into how external flash memory is mapped and used in most of the Espressif SoCs. A single ESP32’s flash can contain multiple apps, as well as many different kinds of data (calibration data, filesystems, parameter storage, etc). For this reason a Partition Table is maintained within the flash.
We first extracted the partition table from the target device. The partition table then can be analysed using gen_esp32part.py
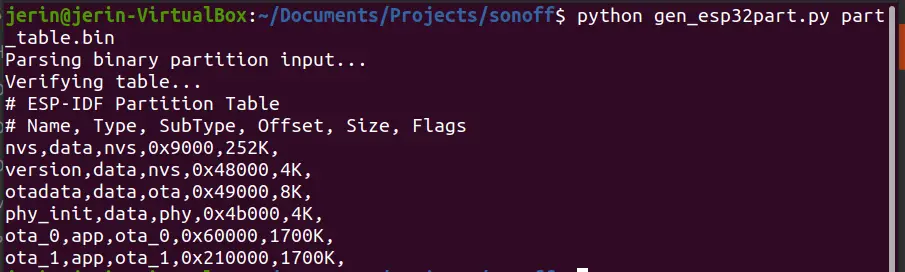
The partition table entries include a name (label), type (app, data, or something else), subtype and the offset where the partition is loaded, as shown in figure above. The type field indicates the data type stored in each partition.
Each of these partitions can be extracted separately and analyzed individually.
Our analysis of these partitions revealed the following:
* The Application firmware is stored in in ota_0 and ota_1 partition. It also contains certificates for authenticating cloud communication.
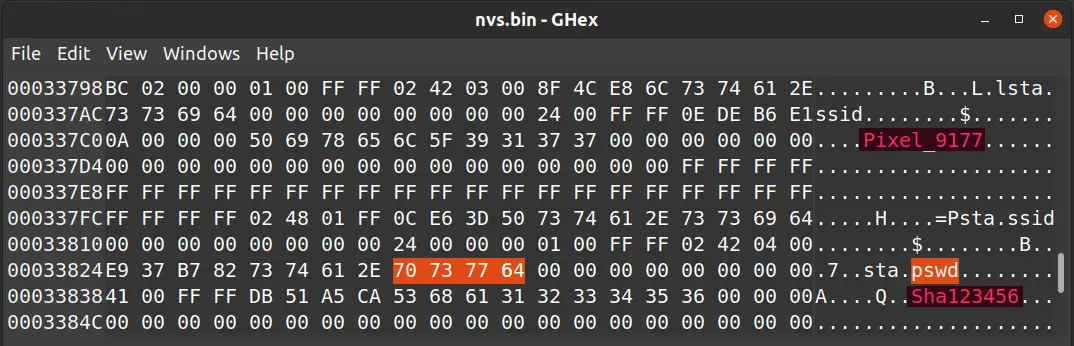
* The NVS partition contains the SSID and password of the Wi-Fi APs.
* The Version partition contains the version information.
* The Otadata, phy_init have other supporting data required for the device to function.
Vulnerability
CWE-1191: On-Chip Debug and Test Interface With Improper Access Control
Firmware Modification
The partition of interest is the application firmware i.e ota_0 and ota_1 , which contains the core app code specific to this smart home device. This is where we expect to find the logic that controls the device’s features, communication protocols, and potentially, any hardcoded credentials or configurations.
However, before we start dissecting the application firmware, it is crucial to determine whether we can modify the firmware and flash it back to the device. This step helps us verify if the device employs any firmware integrity checks, such as digital signatures or checksums, which are designed to prevent unauthorized firmware modifications.
Secure boot Analysis
Espressif SoCs feature a Secure Boot mechanism designed to ensure that only trusted firmware is executed on the device. These SoCs utilize eFuses to store system parameters and enable various security features. The ESP32 Technical Reference Manual provides details on the eFuses and the specific fuses responsible for each feature. We use the espefuse.py tool to inspect the device’s eFuse settings.

On analysing the eFuses the secure boot feature was found to be disabled on the target device as shown in the figure above.
Since secure boot is disabled, the device should, in theory, allow modified firmware to be flashed and executed.
So we decided to modify the application firmware by making a small controlled change and flashing it back to the target device. However, after flashing the modified firmware, the device failed to boot. This hints at the presence of a mechanism that checks for software integrity.
Bypassing Software Integrity Check
ESP32 Application Image Format
ESP32 has a application image format that includes a footer with a single byte checksum and SHA256 hash. ESP32 uses this checksum and hash to verify the application partition. We can use esptool to check if the checksum and hash is valid for the modified file.
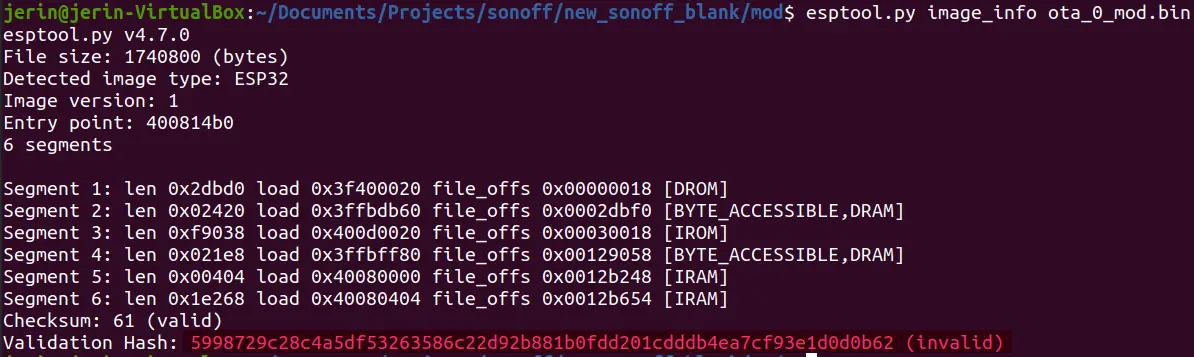
Unless the checksum and hash is valid, the bootloader will panic on startup, and fail to run the modified app partition. Since secure boot is not enabled, this checksum and hash do not provide a strong security guarantee. So we can locate the checksum and hash and modify it.
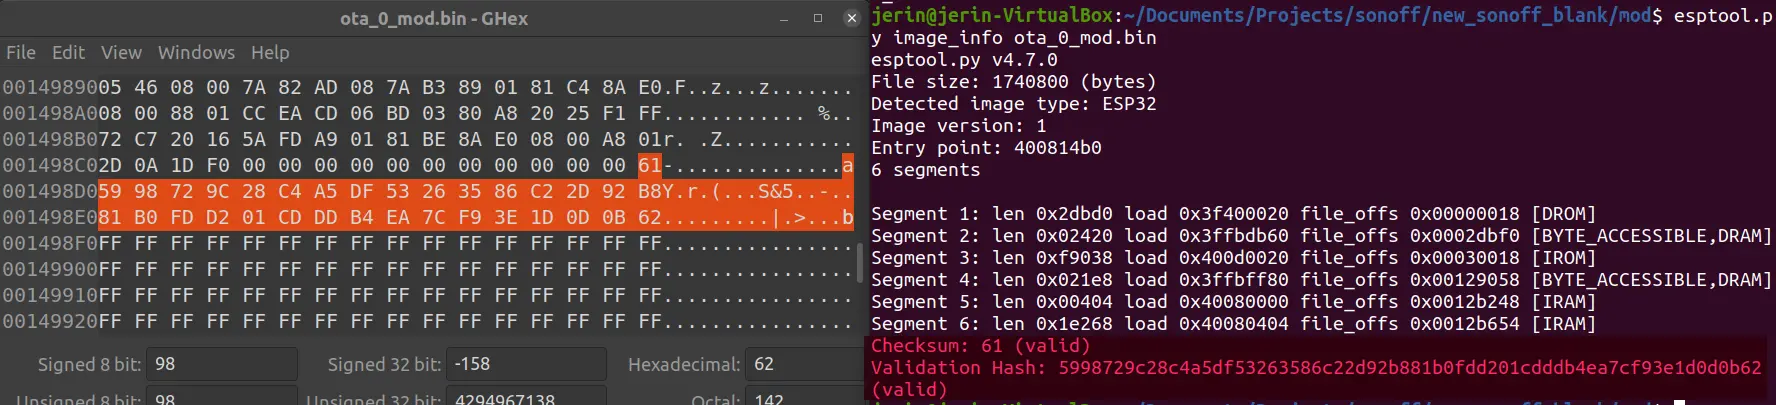
Once the checksum and hash are replaced with valid values, we can flash the modified firmware back to the target device using esptool. This allowed us to successfully boot the modified firmware on the device.
Vulnerability
CWE-1326: Missing Immutable Root of Trust in Hardware
Further Exploitation: Manipulating Device-Cloud Communication
As explained above, Sonoff IoT devices communicate with the cloud to transfer device telemetry and perform various smart operations. Now that we have extracted and successfully boot the modified firmware, we can focus on analysing and manipulating the communication between the device and the cloud.
For this purpose, we need to identify all the API endpoints the IoT device connects to and find any security tokens or keys used for device authentication with the cloud. This will allow us to clone the device as well as asses the security posture of this communication. There are two approaches to accomplish our goals. The first method is to reverse engineer the entire firmware we extracted. The second method is to perform a MITM (Man-In-The-Middle) intercepting the device’s communication with the cloud and inspect the online traffic that goes in and out of it. We opted for the second approach because if successful, it would provide a more complete understanding of the real time communication between the device and the cloud.
MITM Attack
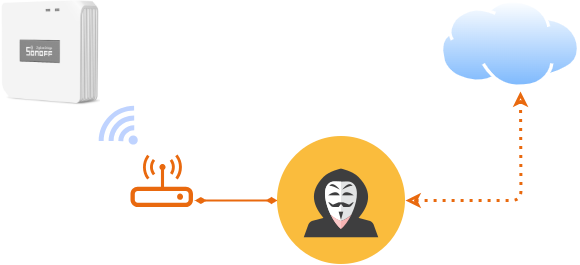
In Man-In-The-Middle (MITM) an attacker intercepts and potentially alters the communication between two parties without their knowledge. This allows the attacker to eavesdrop on the communication, steal sensitive information, or inject malicious data.
Cloud Communication Analysis
Using wireshark we can analyze the WiFi Traffic. Using the device’s assigned IP, we can filter out the traffic particular to the device.

As shown in above wireshark log, the device first sends a DNS query to resolve the IP address for the domain name as-dispd.coolki.cc. After the IP is resolved the device uses this IP address to connect to the web server. After that the device initiates a TLS/SSL connection to the web server.
TLS/SSL
TLS/SSL communication ensures secure data transmission by encrypting the data and verifying the identity of the communicating parties.
Since the device uses TLS communication, unless there is a flaw in the TLS protocol implementation, the device communication to and from the cloud is encrypted and unreadable. To decrypt the communication, we need to set up a a MITM proxy server and route the device’s traffic through it.
Using Burp Suite as a Proxy
Assuming that our device uses HTTP to communicate, we use Burp Suite as the proxy to handle the device traffic. Burp Proxy can be used as web proxy to intercept, inspect, and modify traffic that passes in both directions. For Burp Suite to successfully intercept/decrypt the device traffic , we need to install Burp CA certificate on device.
Replacing CA certificate on device
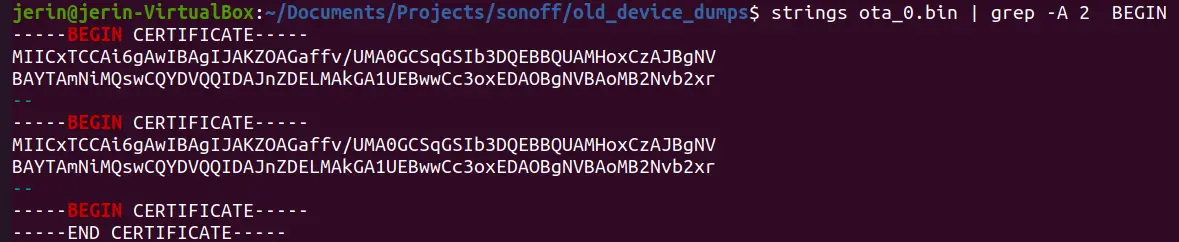
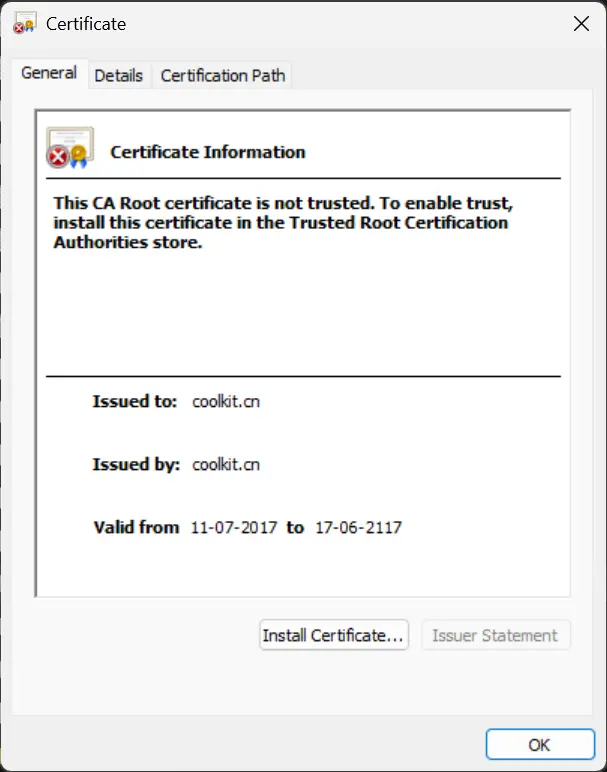
As mentioned above, we had extracted the firmware of the device. Our analysis of the firmware revealed that there are certificates embedded within ota_0 and ota_1 partitions.
Next, we extracted the certificate from the firmware and analyzed it. The extracted certificate appears to be a Root CA certificate, used by the device to authenticate the cloud communication. For Burpsuite to successfully intercept the cloud communication we need to add Burp’s CA certificate in the firmware and then flash the modified firmware back to the device, following the steps described above.
Achieving Successful MITM Interception
With all the prerequisites in place, we are now able to successfully perform the MITM attack and intercept the traffic between the IoT device and the cloud server. The Burp Suite proxy is able to intercept and forward all traffic from the IoT device to the cloud server, as well as forward the server’s response back to the device.
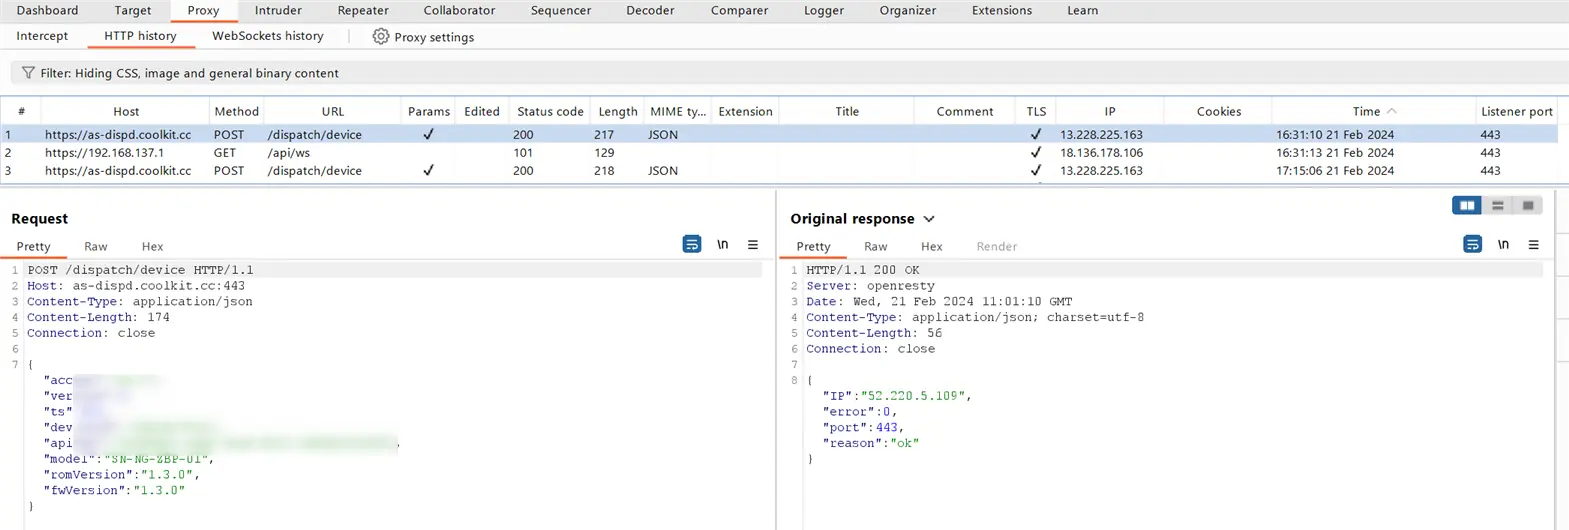
Now that we have the capability to monitor the traffic, we can begin analyzing the communication. It was observed that the device primarily utilizes websockets to transmit sensor data and receive data from the cloud server. We were able to identify various API endpoints and JSON payloads that the device uses to communicate with the cloud. Analyzing the intercepted traffic, we can see the actual payload data transmitted from the device to the cloud server, including sensor data and other information.

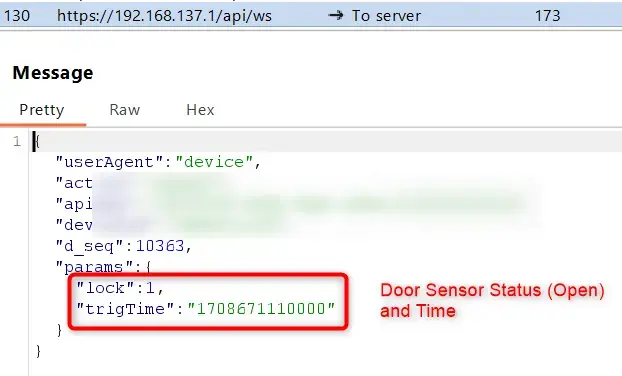
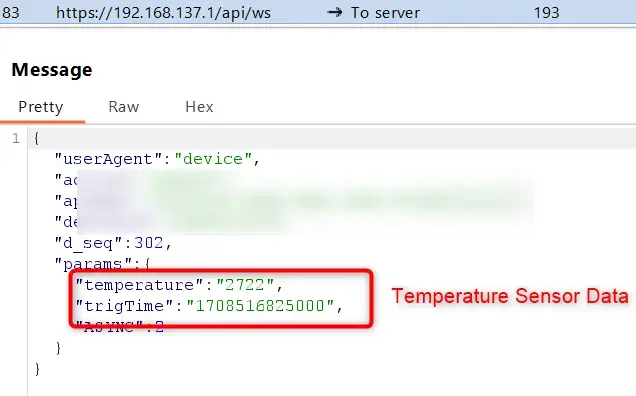
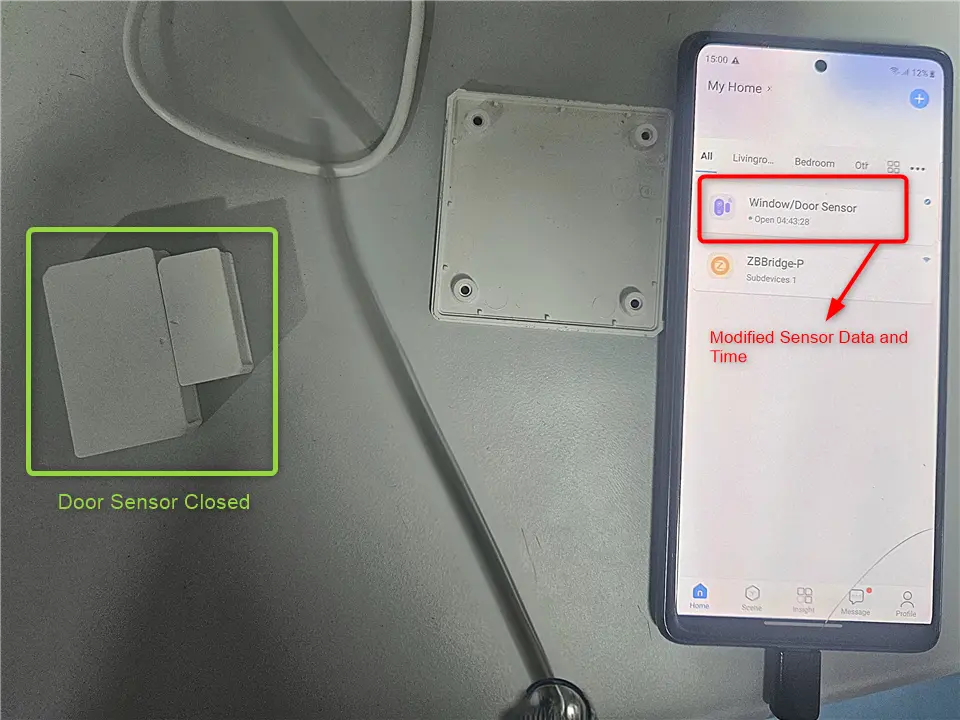
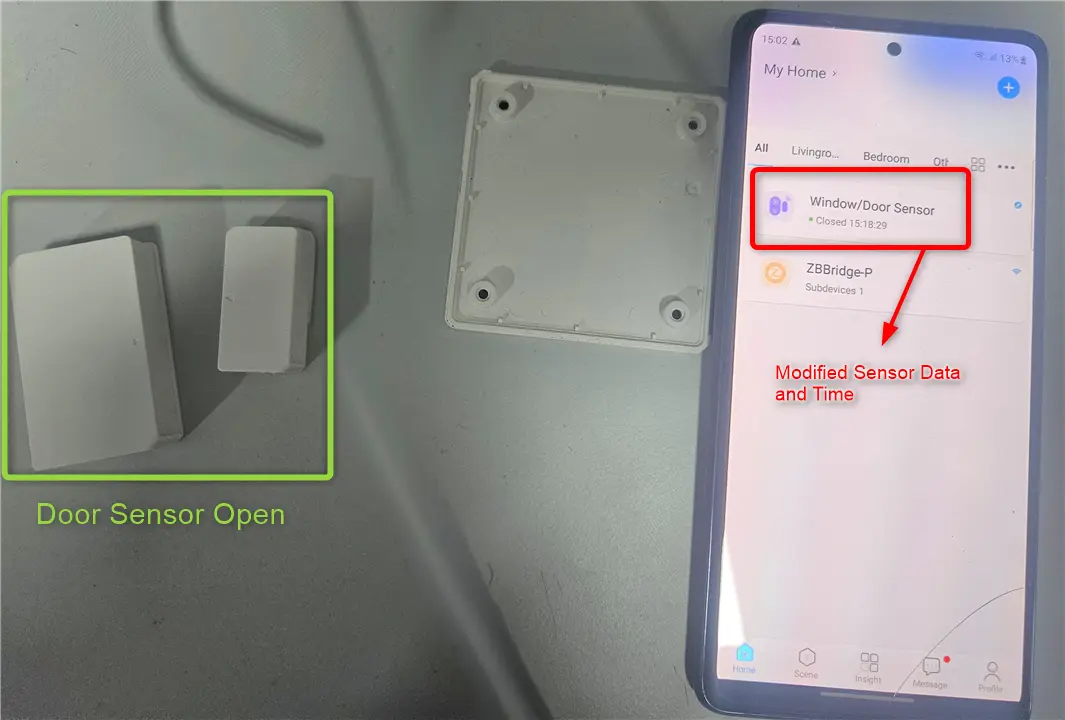
Now that we have identified the payload data, we can modify it and send false data to the cloud server.
Cloning the device
Now we further analyzed the communication for authentication information such as authentication tokens or device keys, which the device uses to authenticate itself to the cloud. We found that the important parameters used to identify and authenticate the device were - device ID , chip ID and the device key. With the parameters obtained , we can now perform authenticated requests to the cloud server as the device and act as the IoT Device remotely, thus sucessfully cloning the device.
We also observed that the cloud server does not check whether the device is already connected. Once the attacker obtains these parameters, they can initiate a connection to the cloud server as the device. In such cases, the cloud server drops the existing legitimate connection, making the device unavailable to the existing user.
We also found that these authentication parameters were exposed by the device and mobile app through various other means, such as unsecured phone logs, Bluetooth pairing information and secondary users homepage. An attacker with knowledge of the API endpoints and payloads could act as the device without necessarily extracting the firmware.
CVE-2024-7205 : Secondary user taking over shared devices as primary user
Now that we have deciphered the whole device to cloud communication. We decided to analyse the mobile app for vulnerabilities.
When a user registers a new device with their account, the smartphone app initiates an API request to the add endpoint, including parameters like the unique device ID and a digest. Decompiling the app revealed that this digest is calculated using both the device key and a secret device key.
We observed that on shared devices, the device key was leaked through the homepage endpoint. When a secondary user accesses their shared home, the mobile app makes an API request to the homepage endpoint, which then leaks this information.
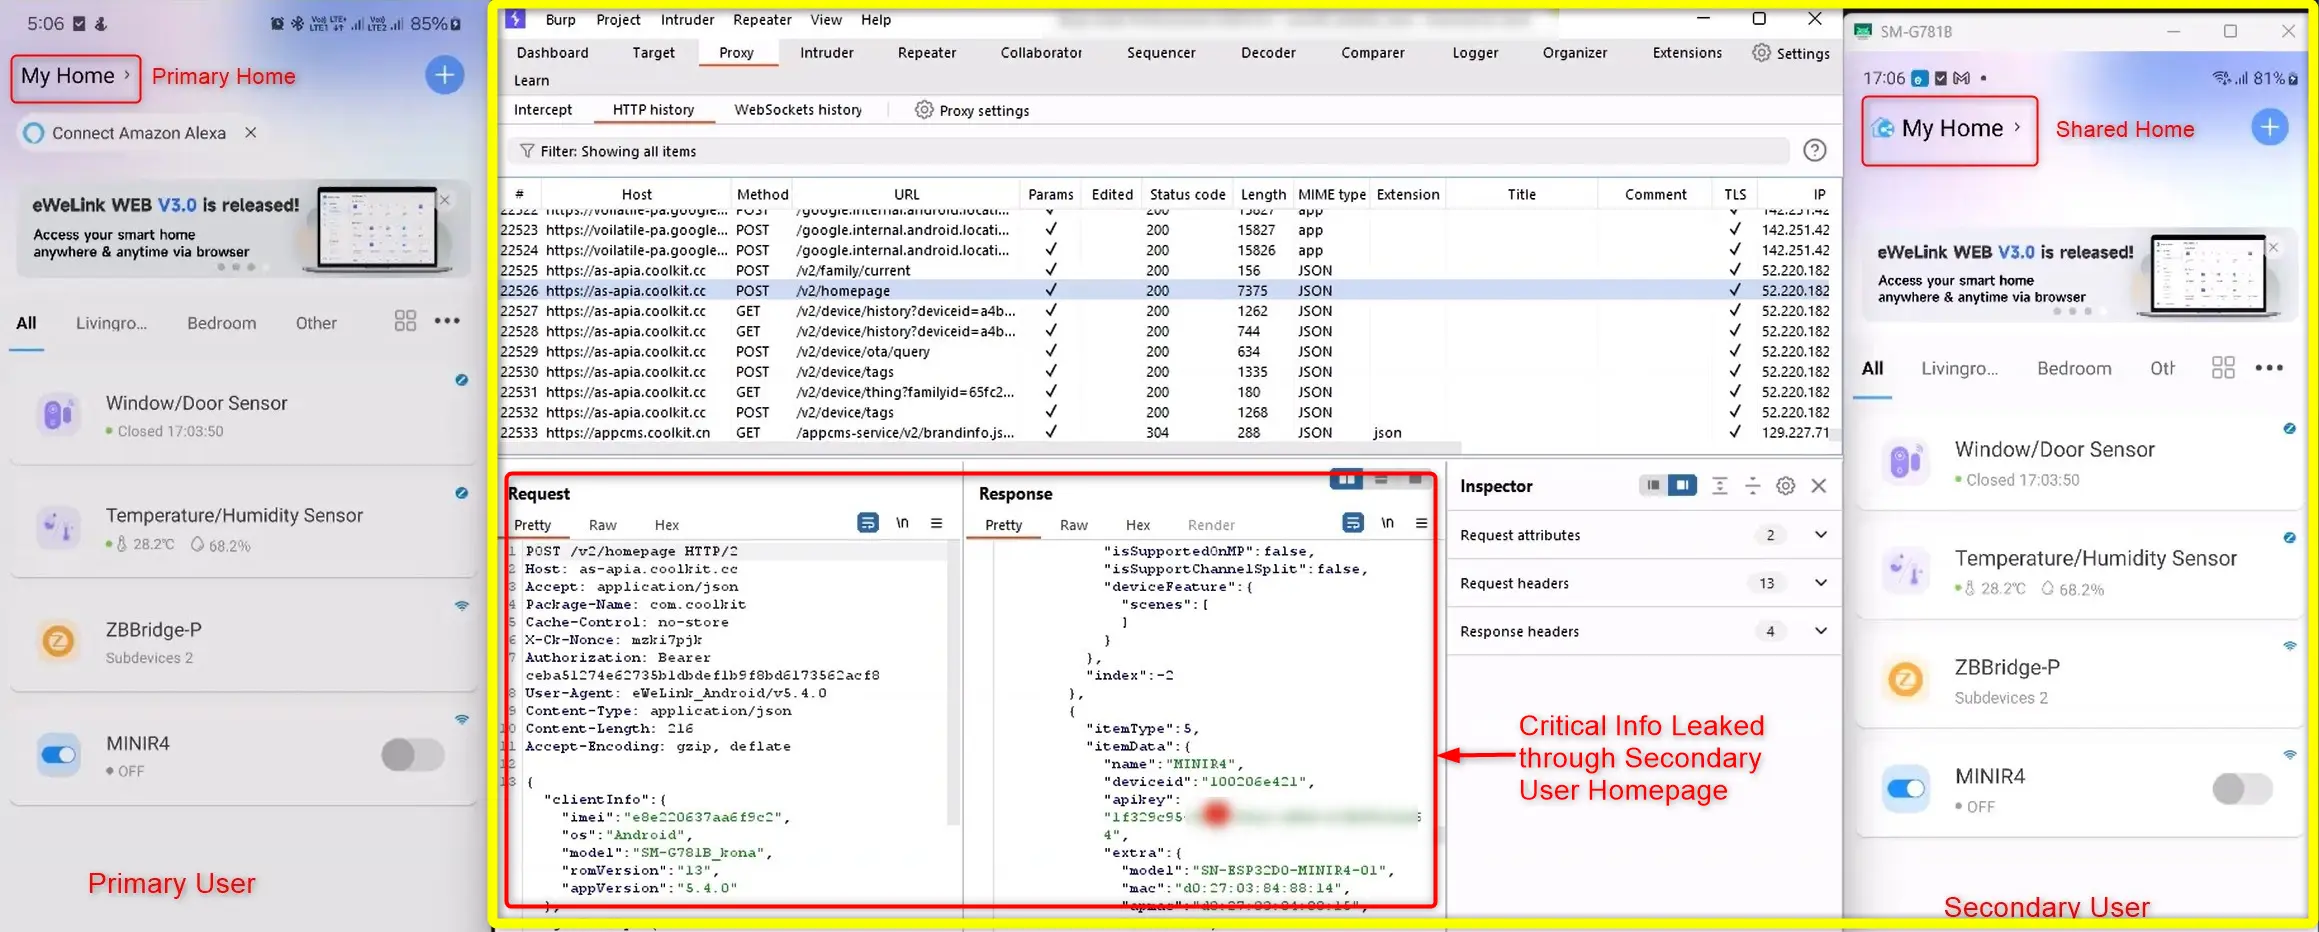
Interestingly, the server only checks the “authorization bearer” token from login, but doesn’t verify if the device is already registered to another account. This means the secondary user or attacker can send a request to the add endpoint with the shared device ID and digest. The server then gives control of the device to the new user, disconnecting the original owner. As a result, the secondary user effectively takes over the primary ownership of the device.
Conclusion
This blog post details the security research conducted on the Sonoff Smart Home IoT device. The key findings are summarized below:
- Firmware extraction was successfully performed via the UART debug port.
- The partition table of the device’s flash memory was examined to understand the organization and storage of the application image and other critical data.
- Modified firmware was flashed back to the device, bypassing integrity checks.
- Device-cloud communication was intercepted using MITM, successfully identifying the API endpoints the device communicates with and the security tokens used for authentication.
- A cloud-based vulnerability was identified, allowing unauthorized primary ownership transfer of shared devices due to insecure API design and insufficient server-side validation.
Disclosure Timeline
1st Feb 2024  - Started research on Sonoff Devices.
26th Mar 2024 - Coolkit added as CNA Authority.
27th Mar 2024 - Reported Vulnerabilities to Coolkit.
30th Mar 2024 - Response by Coolkit Security Team.
9th Apr 2024  - Discussion on the vulnerabilities reported.
7th May 2024  - Detailed report with all the necessary info submitted to Coolkit Team.
16th May 2024 - Few of the vulnerabilities accepted by Coolkit Team.
31st Jul 2024 - Coolkit CNA to assign two CVEs.
8th Oct 2024  - CVEs and Security Advisory published.
Further References
CVE Record (CVE-2024-7206) - https://cve.mitre.org/cgi-bin/cvename.cgi?name=CVE-2024-7206
CVE Record (CVE-2024-7205) - https://cve.mitre.org/cgi-bin/cvename.cgi?name=CVE-2024-7205
eWeLink Security Advisory - https://ewelink.cc/security-advisory-firmware-extraction-and-hardware-ssl-pinning-bypass/
eWeLink Security Advisory - https://ewelink.cc/security-advisory-240730/